Sourcepoint
This document provides the required information for integrating Sourcepoint Dialogue CMP and Contentpass.Please complete the following general steps first
General Tasks
Here, all general tasks are listed. Contentpass does not directly obtain or store any user consent, or any other personal data for that matter. We have integrations with several Consent Management Providers though. Everything CMP-specific is described in the according sub-pages.
Steps:
- Make sure no third party resources are loaded without consent
- Sign up for a Contentpass account
- Configure CNAME Record for Contentpass Session Management
- Mention Contentpass in Privacy Policy
- Integrate Contentpass with your CMP
- Further improvements
0. Load third party resources after consent
For IAB vendors please see our code example in the Third Party Resources documentation. It allows for conditional loading of IAB vendors based on consent state via the TCF API.
For non-IAB vendors you can use the Sourcepoint APIs outlined in the section below.
Content Embeds
To prevent embeds from leaking user data to third parties, please make sure to use Sourcepoint's custom vendors API to check / obtain consent before loading embeds like YouTube videos, Tweets or Facebook Social Plugins.
We suggest the following implementation:
- Use
getCustomVendorConsentsto check the consent state for custom vendors - If consent is available, load the embed
- If consent is not available, display a placeholder with a consent button to inform the visitor about the potential data processing
- Once consent is given, load the embed and display a link below to revoke consent
Script Embeds
Sourcepoint's documentation provides information about how to manage third-party scripts, which is based on setting/ removing the src attribute in your 3rd-party vendor script tags. This requires the following format, which serves as an example:
<!-- Before Modification -->
<script
  type="text/javascript"
  src="https://FBAtag.js"
></script>

<!-- After Modification -->
<script
  id="Facebook_Pixel"
  type="text/javascript"
  sp-src="https://FBAtag.js"
  vendor-id="5fac56cd1ba05165880458ad"
></script>
1. Sign up for Contentpass
Go to publisher.contentpass.net and create your publisher account. The wizard will guide you through the steps of creating a publisher profile as well as the first property. The property's status page will present the required steps for a successful Contentpass integration. This document contains further details that should help you with the process.
2. Configure CNAME Record for Contentpass Session Management
Since 3rd-party cookies don't work reliably anymore in most browsers, Contentpass subscribers must be identified using a 1st-party session.
To simplify handling of these 1st-party sessions, Contentpass provides an endpoint that must be configured behind a CNAME subdomain of the publisher's first-party domain.
In the following example we assume that the publisher's website is: https://www.example.com and the propertyId is 1234abcd. You can find your propertyId in the settings of your property. Can't find it? Get in touch with us to obtain your propertyId.
A CNAME must be set up as follows:
cp.example.com. 300 IN CNAME 1234abcd.12.with.contentpass.net.
Once the CNAME has been set up, Contentpass will automatically provision the required SSL certificates.
3. Mention Contentpass in Privacy Policy
While we do not process any data of non-subscribers, we receive the IP addresses of your visitors for technical reasons. Please inform your visitors about this data processing and link to our privacy policy by including the following snippet on your privacy policy page:
- plain text
- html
Contentpass
Auf unserer Website bieten wir Ihnen den datenschutzfreundlichen und werbefreien Zugang mit Contentpass an. Dies ist ein Angebot der Content Pass GmbH, Wolfswerder 58, 14532 Kleinmachnow, Deutschland. Beim Abschluss des Service wird Contentpass Ihr Vertragspartner.
Um Ihnen diesen Service auf unserer Website anzuzeigen und damit anbieten zu können, verarbeitet Contentpass, in unserem Auftrag, mit dem Besuch unserer Website Ihre IP-Adresse. Für die Registrierung sowie die Vertragsabwicklung des Contentpass und die damit einhergehende Datenverarbeitung ist Contentpass Verantwortlicher im Sinne der DSGVO. Wir sind ausschließlich Verantwortlicher für die Verarbeitung Ihrer IP-Adresse. Sie finden weiterführende Informationen zum Datenschutz direkt bei Contentpass.
Grundlage für die Datenverarbeitung der IP-Adresse, im Rahmen unserer Auftragsverarbeitung mit Contentpass, ist unser berechtigtes Interesse Ihnen die Möglichkeit zu bieten, unsere Website werbe- und tracking-frei aufrufen zu können und Ihr Interesse an der Nutzung unserer Website praktisch ohne Werbung und Tracking [Art. 6 Abs. 1 lit. f) DSGVO]. Zudem erfüllen wir hiermit die rechtliche Verpflichtung, eine rechtskonforme Einwilligung in einwilligungsbedürftige Datenverarbeitungen einzuholen [Art. 6 Abs. 1 lit. c) DSGVO].

Hier gelangen Sie zum Login mit Contentpass oder zur Registrierung.
<h3>Contentpass</h3>
<p>Auf unserer Website bieten wir Ihnen den <a href="https://contentpass.net">datenschutzfreundlichen und werbefreien Zugang mit Contentpass</a> an. Dies ist ein Angebot der Content Pass GmbH, Wolfswerder 58, 14532 Kleinmachnow, Deutschland. Beim Abschluss des Service wird Contentpass Ihr Vertragspartner.</p>
<p>Um Ihnen diesen Service auf unserer Website anzuzeigen und damit anbieten zu können, verarbeitet Contentpass, in unserem Auftrag, mit dem Besuch unserer Website Ihre IP-Adresse. Für die Registrierung sowie die Vertragsabwicklung des Contentpass und die damit einhergehende Datenverarbeitung ist Contentpass Verantwortlicher im Sinne der DSGVO. Wir sind ausschließlich Verantwortlicher für die Verarbeitung Ihrer IP-Adresse. Sie finden <a href="https://www.contentpass.net/privacy">weiterführende Informationen zum Datenschutz direkt bei Contentpass</a>.</p>
<p>Grundlage für die Datenverarbeitung der IP-Adresse, im Rahmen unserer Auftragsverarbeitung mit Contentpass, ist unser berechtigtes Interesse Ihnen die Möglichkeit zu bieten, unsere Website werbe- und tracking-frei aufrufen zu können und Ihr Interesse an der Nutzung unserer Website praktisch ohne Werbung und Tracking [Art. 6 Abs. 1 lit. f) DSGVO]. Zudem erfüllen wir hiermit die rechtliche Verpflichtung, eine rechtskonforme Einwilligung in einwilligungsbedürftige Datenverarbeitungen einzuholen [Art. 6 Abs. 1 lit. c) DSGVO].</p>

<p>Hier gelangen Sie <a href="https://www.contentpass.net/login/" onclick="cp('login'); return false;" target="_top" >zum Login mit Contentpass</a> oder <a href="https://www.contentpass.net/register/" onclick="cp('signup'); return false;" target="_top" >zur Registrierung</a>.</p>
Note:
Link target for login:
javascript: cp('login');
Link target for signup:
javascript: cp('signup');
Since these are not quite ordinary links, it may happen that your CMS does not support them. In that case, you can simply link to https://www.contentpass.net/login and https://www.contentpass.net/signup instead.
4. Sourcepoint Contentpass integration
After the CNAME is set up correctly, the following code won't have any impact on your site until you adjust the Sourcepoint configuration to match the settings mentioned further down.
To get started add the snippet below to your site. Please make sure the Sourcepoint configuration is updated according to your needs, especially the Sourcepoint account id, which must be set correctly. In addition to your existing _sp_.config the isSPA flag must be set to true; This allows us to control the timing of the Sourcepoint scenario execution in the callback of cp('authenticate'). We use a Sourcepoint targeting parameter to distinguish Contentpass users from visitors that have not consented yet. The key acps is used throughout this documentation to refer to that parameter.
Also make sure to check/update the Sourcepoint accountId and the Contentpass configuration variables cpBaseUrl and cpPropertyId.
Add Contentpass snippet
There is a snippet for multi-campaign and one for legacy implementation of sourcepoint. If you are setting up Sourcepoint for the first time please use the multi-campaign snippet. If not, we recommend that you migrate to the multi-campaign mode, while touching your Sourcepoint integration anyways.
Info: When migrating from legacy to multi-campaign you will need to enable multi-campaign in Sourcepoint first. Make sure to update the Sourcepoint stub and script URL and our code snippet. Beware of one breaking change – Sourcepoint moved the targeting parameters to the new gdpr object in their config. It's all included in the snippet below. See sourcepoint docs for more information around the migration.
Once the privacy policy step is completed, the Sourcepoint SDK can be integrated immediately. This allows you to test the further setup of Sourcepoint on their staging environment right away. Integrating the code immediately will not show users the Contentpass layer until the campaigns are fully set up in Sourcepoint.
- Multi-campaign
- Legacy-campaign
<script type="text/javascript" data-description="sourcepoint stub code">
  function _typeof(t){return(_typeof="function"==typeof Symbol&&"symbol"==typeof Symbol.iterator?function(t){return typeof t}:function(t){return t&&"function"==typeof Symbol&&t.constructor===Symbol&&t!==Symbol.prototype?"symbol":typeof t})(t)}!function(){for(var t,e,o=[],n=window,r=n;r;){try{if(r.frames.__tcfapiLocator){t=r;break}}catch(t){}if(r===n.top)break;r=n.parent}t||(function t(){var e=n.document,o=!!n.frames.__tcfapiLocator;if(!o)if(e.body){var r=e.createElement("iframe");r.style.cssText="display:none",r.name="__tcfapiLocator",e.body.appendChild(r)}else setTimeout(t,5);return!o}(),n.__tcfapi=function(){for(var t=arguments.length,n=new Array(t),r=0;r<t;r++)n[r]=arguments[r];if(!n.length)return o;"setGdprApplies"===n[0]?n.length>3&&2===parseInt(n[1],10)&&"boolean"==typeof n[3]&&(e=n[3],"function"==typeof n[2]&&n[2]("set",!0)):"ping"===n[0]?"function"==typeof n[2]&&n[2]({gdprApplies:e,cmpLoaded:!1,cmpStatus:"stub"}):o.push(n)},n.addEventListener("message",(function(t){var e="string"==typeof t.data,o={};if(e)try{o=JSON.parse(t.data)}catch(t){}else o=t.data;var n="object"===_typeof(o)?o.__tcfapiCall:null;n&&window.__tcfapi(n.command,n.version,(function(o,r){var a={__tcfapiReturn:{returnValue:o,success:r,callId:n.callId}};t&&t.source&&t.source.postMessage&&t.source.postMessage(e?JSON.stringify(a):a,"*")}),n.parameter)}),!1))}();
</script>

<script type="text/javascript" data-description="sourcepoint configuration">
  window._sp_ = {
    config: {
      // Please include your existing accountId as provided by Sourcepoint
      accountId: {{accountId}},
      // Sourcepoint base endpoint, no change needed – Sourcepoint recommends to only use a single endpoint
      // https://documentation.sourcepoint.com/implementation/web-implementation/multi-campaign-web-implementation/best-practices-improve-gdpr-tcf-v2-message-loading#leverage-single-server-endpoint
      baseEndpoint: 'undefined',
      // other possible Sourcepoint configurations
      // ...
      // New: The isSPA setting is needed to make sure the Sourcepoint scenario starts after executeMessaging() is called below
      isSPA: true,
      // New: This "acps" targeting parameter is being used to not display the layer for contentpass users
      // If you already use targetingParams, please make sure to extend the object accordingly
      gdpr: {
        targetingParams: {
          acps: 'false'
        },
      },
    }
  };
</script>

<script type="text/javascript" src="https://cdn.privacy-mgmt.com/unified/wrapperMessagingWithoutDetection.js"></script>

<script type="text/javascript" data-description="contentpass integration">
  (function() {
    var cpBaseUrl = 'https://cp.example.com';
    var cpController = cpBaseUrl + '/now.js';
    var cpPropertyId = '1234abcd';

    !function(C,o,n,t){C.CPObject=n,C[n]||(C[n]=function(){
    for(var e=arguments.length,i=new Array(e),c=0;c<e;c++)i[c]=arguments[c];var a=i[0],r=i[1],f=i[2];if(C[n].q||(C[n].q=[]),
    C[n].q.push(i),!C[n].patched)if("fatal"===a&&r){C[n].le=r;for(var u=C[n].q,h=0;h<u.length;h+=1){var l=u[h]
    ;if("error"===l[0]&&"function"==typeof l[1])try{l[1](r)}catch(e){}}}else if("error"===a&&"function"==typeof r){
    if(C[n].le)try{r(C[n].le)}catch(e){}}else if("extension"===a&&r){if(f&&"function"==typeof f.init)try{f.init(),
    f.initialized=!0}catch(e){}}else if("authenticate"===a&&"function"==typeof r){var s=!1;try{
    s=-1===(o.cookie||"").indexOf("_cpauthhint=")&&!(C.localStorage||{})._cpuser&&-1===C.location.href.toLowerCase().indexOf("cpauthenticated")
    }catch(e){}if(s){var d={isLoggedIn:function(){return!1},hasValidSubscription:function(){return!1}
    },p=r,y=!1,v=function(e,i){if(!y){y=!0;try{p(e,i)}catch(e){}}};if(i[1]=v,"function"==typeof o.hasPrivateToken)try{
    o.hasPrivateToken(t||"https://my.contentpass.net").then(function(e){e||v(null,d)})["catch"](function(){})}catch(e){
    v(null,d)}else v(null,d)}}});try{var e=(o.cookie.split("_cpauthhint=")[1]||"").split(";")[0]
    ;1&Number(e)&&(o.body?o.body.classList.add("cpauthenticated"):o.addEventListener("DOMContentLoaded",function(){
    o.body.classList.add("cpauthenticated")}))}catch(e){}C[n].l=+new Date,C[n].sv=7}(window,document,"cp");

    // Will activate contentpass and initialize basic interfaces for
    // communicating with contentpass.
    cp('create', cpPropertyId, {
      baseUrl: cpBaseUrl
    });

    // This function will trigger rendering of the Sourcepoint consent layer. First, it will check
    // whether the current user is an authenticated contentpass user. If so, the targeting parameter
    // acps is set to the string value 'true' (important: the value is not a bool, but a string!).
    // If the user is not an authenticated contentpass user, the targeting parameter is set to
    // 'false'. Make sure to not show the consent layer when the targeting parameter is set to 'true'
    // in your Sourcepoint scenario. When login status is determined, Sourcepoint is automatically
    // triggered by calling window._sp_.executeMessaging().
    cp('render', {
      onFullConsent: function() {
        console.log('[CP] onFullConsent');
        // Init advertising here
        //
        // Attention:
        // When you update your vendor list without asking for re-consent
        // then Sourcepoint does not signal full consent for previously
        // fully consented visitors. Thus this callback is not executed,
        // and partially consented impressions are not monetized at all!
        //
        // We therefore strongly recommend to configure your Sourcepoint
        // scenario setup to always ask for re-consent on vendor updates.
        //
        // Alternatively you can always load vendors specifically based
        // on their respective consent status according to the TCF API.
        // You can find a sample integration for this on
        // https://docs.contentpass.net/docs/3rdparty
      }
    })
  })()
</script>

<script src="https://cp.example.com/now.js" async fetchPriority="high" onerror="cp('fatal', arguments)"></script>

<script type="text/javascript" data-description="contentpass sourcepoint authenticate usage">
(function () {
  cp('authenticate', function(err, user) {
    if (err || (!user.isLoggedIn() && !user.hasValidSubscription())) {
      (function spExecMsg() {
        if (window._sp_ && window._sp_.executeMessaging) {
          if (!window._sp_.config.isSPA) {
            console.warn('[SPCP] Sourcepoint not in SPA mode!');
          } else if (window._sp_.version) {
            console.log('[SPCP] Sourcepoint already running');
          } else {
            console.log('[SPCP] Starting Sourcepoint');
            window._sp_.executeMessaging();
          }
        } else {
          console.log('[SPCP] Sourcepoint not loaded yet. Retrying.');
          setTimeout(spExecMsg, 10);
        }
      })();
    }
  });
})();
</script>
<script type="text/javascript" data-description="sourcepoint stub code">
  !function () { var e = function () { var e, t = "__tcfapiLocator", a = [], n = window; for (; n;) { try { if (n.frames[t]) { e = n; break } } catch (e) { } if (n === window.top) break; n = n.parent } e || (!function e() { var a = n.document, r = !!n.frames[t]; if (!r) if (a.body) { var i = a.createElement("iframe"); i.style.cssText = "display:none", i.name = t, a.body.appendChild(i) } else setTimeout(e, 5); return !r }(), n.__tcfapi = function () { for (var e, t = arguments.length, n = new Array(t), r = 0; r < t; r++)n[r] = arguments[r]; if (!n.length) return a; if ("setGdprApplies" === n[0]) n.length > 3 && 2 === parseInt(n[1], 10) && "boolean" == typeof n[3] && (e = n[3], "function" == typeof n[2] && n[2]("set", !0)); else if ("ping" === n[0]) { var i = { gdprApplies: e, cmpLoaded: !1, cmpStatus: "stub" }; "function" == typeof n[2] && n[2](i) } else a.push(n) }, n.addEventListener("message", (function (e) { var t = "string" == typeof e.data, a = {}; try { a = t ? JSON.parse(e.data) : e.data } catch (e) { } var n = a.__tcfapiCall; n && window.__tcfapi(n.command, n.version, (function (a, r) { var i = { __tcfapiReturn: { returnValue: a, success: r, callId: n.callId } }; t && (i = JSON.stringify(i)), e.source.postMessage(i, "*") }), n.parameter) }), !1)) }; "undefined" != typeof module ? module.exports = e : e() }();
</script>

<script type="text/javascript" data-description="sourcepoint configuration">
  window._sp_ = {
    config: {
      // Please include your existing accountId as provided by Sourcepoint
      accountId: {{accountId}},
      // Sourcepoint base endpoint, no change needed – Sourcepoint recommends to only use a single endpoint
      // https://documentation.sourcepoint.com/implementation/web-implementation/multi-campaign-web-implementation/best-practices-improve-gdpr-tcf-v2-message-loading#leverage-single-server-endpoint
      baseEndpoint: 'undefined',
      // other possible Sourcepoint configurations
      // ...
      // New: The isSPA setting is needed to make sure the Sourcepoint scenario starts after executeMessaging() is called below
      isSPA: true,
      // New: This "acps" targeting parameter is being used to not display the layer for contentpass users
      // If you already use targetingParams, please make sure to extend the object accordingly
      targetingParams: {
        acps: 'false'
      },
    }
  };
</script>

<script type="text/javascript" src="https://cdn.privacy-mgmt.com/wrapperMessagingWithoutDetection.js"></script>

<script type="text/javascript" data-description="contentpass integration">
  (function() {
    var cpBaseUrl = 'https://cp.example.com';
    var cpController = cpBaseUrl + '/now.js';
    var cpPropertyId = '1234abcd';

    !function(C,o,n,t){C.CPObject=n,C[n]||(C[n]=function(){
    for(var e=arguments.length,i=new Array(e),c=0;c<e;c++)i[c]=arguments[c];var a=i[0],r=i[1],f=i[2];if(C[n].q||(C[n].q=[]),
    C[n].q.push(i),!C[n].patched)if("fatal"===a&&r){C[n].le=r;for(var u=C[n].q,h=0;h<u.length;h+=1){var l=u[h]
    ;if("error"===l[0]&&"function"==typeof l[1])try{l[1](r)}catch(e){}}}else if("error"===a&&"function"==typeof r){
    if(C[n].le)try{r(C[n].le)}catch(e){}}else if("extension"===a&&r){if(f&&"function"==typeof f.init)try{f.init(),
    f.initialized=!0}catch(e){}}else if("authenticate"===a&&"function"==typeof r){var s=!1;try{
    s=-1===(o.cookie||"").indexOf("_cpauthhint=")&&!(C.localStorage||{})._cpuser&&-1===C.location.href.toLowerCase().indexOf("cpauthenticated")
    }catch(e){}if(s){var d={isLoggedIn:function(){return!1},hasValidSubscription:function(){return!1}
    },p=r,y=!1,v=function(e,i){if(!y){y=!0;try{p(e,i)}catch(e){}}};if(i[1]=v,"function"==typeof o.hasPrivateToken)try{
    o.hasPrivateToken(t||"https://my.contentpass.net").then(function(e){e||v(null,d)})["catch"](function(){})}catch(e){
    v(null,d)}else v(null,d)}}});try{var e=(o.cookie.split("_cpauthhint=")[1]||"").split(";")[0]
    ;1&Number(e)&&(o.body?o.body.classList.add("cpauthenticated"):o.addEventListener("DOMContentLoaded",function(){
    o.body.classList.add("cpauthenticated")}))}catch(e){}C[n].l=+new Date,C[n].sv=7}(window,document,"cp");

    // Will activate contentpass and initialize basic interfaces for
    // communicating with contentpass.
    cp('create', cpPropertyId, {
      baseUrl: cpBaseUrl
    });

    // This function will trigger rendering of the Sourcepoint consent layer. First, it will check
    // whether the current user is an authenticated contentpass user. If so, the targeting parameter
    // acps is set to the string value 'true' (important: the value is not a bool, but a string!).
    // If the user is not an authenticated contentpass user, the targeting parameter is set to
    // 'false'. Make sure to not show the consent layer when the targeting parameter is set to 'true'
    // in your Sourcepoint scenario. When login status is determined, Sourcepoint is triggered by
    // calling window._sp_.executeMessaging().
    cp('render', {
      onFullConsent: function() {
        console.log('[CP] onFullConsent');
        // load advertising
      }
    })
  })()
</script>

<script src="https://cp.example.com/now.js" async fetchPriority="high" onerror="cp('fatal', arguments)"></script>

<script type="text/javascript" data-description="contentpass sourcepoint authenticate usage">
(function () {
  cp('authenticate', function(err, user) {
    if (err || (!user.isLoggedIn() && !user.hasValidSubscription())) {
      (function spExecMsg() {
        if (window._sp_ && window._sp_.executeMessaging) {
          if (!window._sp_.config.isSPA) {
            console.warn('[SPCP] Sourcepoint not in SPA mode!');
          } else if (window._sp_.version) {
            console.log('[SPCP] Sourcepoint already running');
          } else {
            console.log('[SPCP] Starting Sourcepoint');
            window._sp_.executeMessaging();
          }
        } else {
          console.log('[SPCP] Sourcepoint not loaded yet. Retrying.');
          setTimeout(spExecMsg, 10);
        }
      })();
    }
  });
})();
</script>
Keeping Contentpass code snippet up to date
We’re always aiming to improve the Contentpass code snippet to ensure optimal performance, compatibility, and functionality. Sometimes also updates of our CMP partners require an update of our integration, and thus your code that initializes the CMP and Contentpass.
To save effort on your end, we want to keep the amount of updates low, but on the other hand those updates should never be breaking changes. But of course it's always beneficial to use the latest version.
How to know when an update is needed
We check your integration with our daily property reviews. The property status page in your publisher dashboard will either show a green, yellow or red status. For yellow, we strongly recommend to update, but it's not urgent. In case you landed here because the code snippet check turned red, or you got the corresponding mail notification, please immediately update the Contentpass code snippet.
How to update the Contentpass code snippet
Simply replace the outdated snippet with the latest version. You’ll always find the latest version in the above section: Add Contentpass snippet.
Sourcepoint first layer
You can start by using the Contentpass template from Sourcepoint's global template library. If you prefer to build upon your existing message, you can also include the Contentpass functionality the following way:
- Add a signup for Contentpass button to include the "Action" "Custom Javascript" with the value:
cp('signup'); - Add a login with Contentpass link to include the "Choice option" "Custom Javascript" with the value
cp('login');
If your Sourcepoint message builder does not offer the functionality to add Custom Javascript on links and buttons, please reach out to your Sourcepoint representative to enable this feature.
In all cases, please make sure to include the Contentpass logo on the signup button (with the same color as the corresponding button text) and all text regarding Contentpass is the same as in the global template. If you want assistance with the setup, just invite product+YOUR-COMPANY-NAME@contentpass.de to your Sourcepoint property.
Sourcepoint privacy manager
According to the IAB policy you're allowed to hide the toggles in the privacy manager when offering paid access. You can do this via the Toggle Settings. Or via Custom CSS, in case that functionality is not available on your Sourcepoint instance. You legally must provide the option to revoke consent easily e.g. via a "Cookie Settings" link in your footer. Please refer to Sourcepoint's documentation for instructions on implementation. We recommend to provide a second privacy manager for this, with more granular options and a revoke all option. In case a user revokes consent there, your scenario setup can display the layer again on the next impression.
Sourcepoint scenario
The base setup usually consists of two steps containing the "Consent Gate" conditions "No Action" and "Rejected to Any" to surface the consent layer for visitors with insufficient consent status.
Please include an additional condition in all your current and future scenario steps of all active scenarios to prevent messaging from being shown to Contentpass users. Click the Add Condition button and then select Key Value Pair Targeting. Please make sure this condition is anywhere before the message delivery setting.
This Key Value Pair has to be set up the following way:
- Pages:
exclude(selecting exclude negates the key value pair) - Key:
acps(key of our custom targeting parameter) - Value:
match(we only want exact matches) - String:
true(value of our custom targeting parameter)
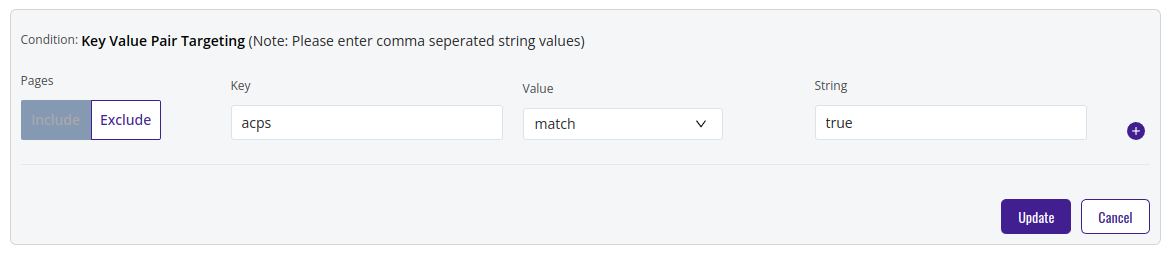
We strongly recommend, that you also add a "Page URL Match" condition to keep legal pages like your privacy policy accessible.
For further options please refer to Sourcepoint's documentation.
Allow the user to open the CMP settings
To ensure you are fully compliant with privacy regulations while maintaining a positive user experience, we recommend setting up two separate Privacy Managers:
- A Simple Manager: Available from Layer 1, this manager is for informational purposes only. It doesn't need to include granular choices.
- A Granular Manager: Accessible from the footer (or other prominent locations), this manager provides granular choices and the ability to reject all.
ID. There you will find the ID for your property that you will need to pass as the argument to the function.You can easily trigger this function by adding a link to your footer with an onclick handler like this:
<a href="#" onclick="_sp_.gdpr.loadPrivacyManagerModal(PRIVACY_MANAGER_ID);return false;">Open Consent Settings</a>
5. Further Improvements
5.1 Performance Optimizations (optional)
Providing a reliable and high-performant service is one of our highest concerns. Our components are loaded asynchronously, so chunks are fetched only as needed.
Speed up connection to our servers
One way in which you can improve the initial loading time of your page is by adding a preconnect link element to the head of your website. This will tell the browser to initiate a connection to our servers as early as possible so it is ready when our actual SDK is requested.
The following snippet contains a placeholder value that you need to replace with the correct value for your property
The href placeholder
https://cp.example.comshould use the CNAME created for your property. You can find the correct values for the property on the publisher dashboard.
You can find the correct values for your property on the Publisher Dashboard
Please replace the href placeholder and add the following tag to the head of your page, as high up in the HTML as possible.
<link rel="preconnect" href="https://cp.example.com" />
You can also initiate a preconnect via the Link HTTP header
Additionally, incorporating the fetchPriority attribute in our SDK script tag, setting its value to "high", and placing it high up inside the element of the HTML can significantly enhance the page's response time. This is because the browser can immediately fetch the resources it needs to render the first layer.
Faster Loading
In some rare situations you may want to load third-parties without basing it on TCF-Consent, but not load them for Contentpass users. There is a way to accomplish this without relying on our backend, thus without additional request. Please consult our Loading third-parties for non-subscribers only section in the third-party docs for details.
5.2 Improving UX for Contentpass users
We offer a few methods for you to recognize if the current visitor is a Contentpass subscriber, so you can improve the user experience for them. This can be achieved on both the client and server side.
Client-Side Javascript
To check if a Contentpass subscriber is authenticated on the front-end we recommend using our SDK method: cp('authenticate'), see our web-sdk docs for more details.
The callback argument will return an object that contains all the up-to-date information you need to determine a user with a valid Contentpass session.
cp('authenticate', function (error, user) {
  if (error) {
    // Error handling depending on use case
    return;
  }

  if (user.isLoggedIn() && user.hasValidSubscription()) {
    // User has valid subscription
  } else {
    // User has no valid subscription
  }
});
The .cpauthenticated CSS class
To avoid having lots of empty ad-slots for Contentpass users, we provide a way to recognize Contentpass users on the client-side via CSS.
We provide a special css selector cpauthenticated which allows you to easily change the page styling depending on the user's authentication status.
When an authenticated user is logged-in the class name cpauthenticated is added to the class list of the body tag.
This provides you with the means to easily customise any child elements without having to check the subscription status yourself.
Please ensure that this CSS rule is applied as early as possible on your page to avoid layout shifts of the page content! Adding it to the first CSS file that is loaded on your page is recommended, or as high up as possible in the <head> of your page.
Examples
Basic example: hiding all containers with a specific class for authenticated users
This basic css can be added to your stylesheet to hide all containers with the class ad-container as soon as the user is logged in with Contentpass
body.cpauthenticated .ad-container {
  display: none;
}
Advanced example: hiding containers which have anchor tags with a specific href
This example shows how to hide all containers with the class ads which contain an
anchor tag with an href starts with http and that does not contain
example.com/. This is useful to e.g. hide all external ads that are not from
your own domain while e.g. still showing internal sponsored articles.
<html lang="en">
    <head>
      <style>
        body.cpauthenticated
          .ads:has(a[href^="http"]:not([href*="example.com/"])) {
          display: none;
        }
      </style>
    </head>

    <body class="cpauthenticated">
      <div class="ads">
        <p>adserver.com</p>
        <a href="https://adserver.com/?redirect=123">
          <img src="..." />
        </a>
      </div>

      <div class="ads">
        <p>example.com</p>
        <a href="https://example.com/mysponsoredarticle.html">
          <img src="..." />
        </a>
      </div>
    </body>
  </html>
Conclusion
The cpauthenticated class provides developers with a convenient way to manage user authentication states and dynamically adjust the display of elements within their web applications. By leveraging the cpauthenticated class, developers can create a more personalized and seamless user experience for their audience.
We do not recommend relying on this as a robust method for recognizing Contentpass users for business logic. CSS classes can be easily manipulated by the user or any other javascript running on the page. Additionally there is no guarantee that the CSS styles are applied before your javascript runs.
Server-Side Cookie
For recognizing Contentpass users on the backend we provide a _cpauthhint cookie that we set on the user's browser. If the user is a logged-in Contentpass user the cookie will have a value of 1 and 0 if they are logged out.
The following is a simplified-code example of how one might check for the cookie on a node.js server, in order to serve content without anti-adblocking messages for Contentpass users and only for regular users.
// Middleware to check the "_cpauthhint" cookie
function checkUserType(req, res, next) {
  const cpAuthHintCookie = req.cookies._cpauthhint;

  // Check if the cookie exists and has the value for a logged in CP user
  req.isLoggedInCpUser = cpAuthHintCookie === '1';

  next();
}

// Route that uses the authentication middleware
app.get('/dashboard', checkUserType, function (req, res) {
  // Render different views for ContentPass users and regular users
  if (req.isCpUser) {
    res.render('dashboard', { user: 'ContentPassUser', showAdblockCommunication: false });
  } else {
    res.render('dashboard', { user: 'RegularUser', showAdblockCommunication: true });
  }
});